


The eyes can be one of the most important things in your photos. They draw people in, and capture their attention. SO why not give then the POP they deserve! Eye pops are MUCH MUCH easier on Blue or green eyes, but will a little more work can be done on brown eyes too. There are a few different ways you can give your eyes pop, it just depends on the eye and the color. So play around and see which way works best.
First you want to select the Iris of the eye. Its best to zoom in very close so you can get more EXACT lines. You can use the free hand lasso tool to draw the line around the eye, but I have always had better luck with the intelligent scissors. You simply place dots around the eye and it "connects the dots" for you. AT the bottom of the tool box, make sure your FEATHERED EDGE box is checked. This will Blend your selection edges into its surroundings, so your changes wont be AS notable. I like to keep it a 10 MOST times. Once you reach your beginning point hit ENTER, and a moving dashed line will appear. This means your eye is now a SELECTION.
Over in your tool box at the bottom, click on the second MODE button. This will allow you to add another selection(your other eye). Do the same thing to the second eye and hit Enter. Now you will have TWO selected eyes.
Now here is where you can play around with different ways to give your eyes that pop. Just be careful not to OVER POP...or you will end up getting a weird alien like look. :) Each Set of instructions you can do on its own, or added with other steps..its totally up to you. 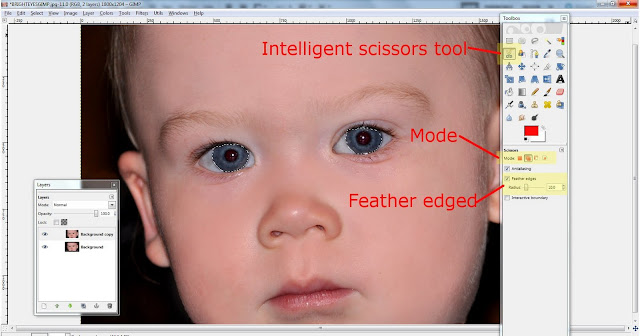

SET1~ Go to Filters, Enhance, Unsharpen mask. This will MASK or cover up anything that is UNSHARPENING your eyes. Keep your Radius under 10(I used 8), Amount under 1(I used .9), and Threshold at 0.
(This was the ONLY change I made In little Joejoe's eyes, and you can already see such a huge difference!)

SET 2~ Go to Filters, Generic, and play with Dilate or Erode. This one is Great for Brown eyes.(on this one I used this step AND the Unsharpen mask)

SET 3~ Go to Colors, Hue/ Saturation, Turn up the saturation up a tad. If you want to change the color of the eye you can play with the hue. Fun to do if you want to give yourself a new color of eyes one day! ;)

SET 4~ Go to Colors, Curves, play with your line curve. only do SMALL adjustments on this one, because it's SUPER easy to give alien eye with this!
SET5~ Use your Dodge burn tool to darken the pupil of the eye, and lighten the iris of the eye. Turn the opacity down on your tool. ( at the top of the bottom section of your tool box).
Have fun...and REMEMBER...dont go alien eyes!


No comments:
Post a Comment