


Lets start with our Tool box! This is your long box that is found on the side of your page. You have a set of DOUBLE arrows at the very top of the box. This gives you the option to change the look of your tool box (short and wider, or thin and longer). If your Tool box ever goes missing, you can easily find it under WINDOWS and TOOLS!
Here is your tool box, and the name of each tool. Remember that SOME tools when your right click on them have OTHER tools hiding under them. I will put BOTH tools in the names below! , and their explanations under that.

Now the break down of the tools......BASIC..remember! :)
Move Tool~ Allows you to move each object, as long as they are each on their own layer. SO it's best to use LOTS of layers! You can also use this tool to Rotate your picture, by dropping your mouse just below the bottom center dot, two small curved arrows will appear. You can then rotate your picture.
Re size Tool~ Allows you to change the size of your picture of adjust. You can grab any dot around the border of your picture and drag to the right size, or you can grab a corner dot to keep the correct ratio of the picture, so you don't get dis proportioned pictures. Most times you want to always use the corner dots.
Zoom Tool~ Allows you to zoom in and out of your picture. You can change the option to zoom in or out at the top OPTIONS bar above the tool box. You are also given the option to "fit to screen""Fill the screen" and "print size". Another option for zooming in and out is at the very bottom left of your screen you can change the percentage. This will zoom in or out.
Hand Tool~ Allows you to pan around your picture. You can click and drag up, down right or left.
Eyedropper Tool~ Allows you to click on any color on your page(make sure you are on the right layer also) and it "picks" the color up, so you can use it on your next action.
Rectangle Marquee Tool~ Allows you to select a part of your picture in the shape of a rectangle.
Elliptical Marquee Tool~ Allows you to select a part of your picture in the shape of a circle or oval.
Lasso Tool~ Allows you to select a part of your picture "freehand".
Magnetic Lasso Tool~ The lasso acts as a magnet and snaps to the closest matching colors. This works best on pictures with high contrast.
Polygonal Lasso Tool~ Allows you to make a selection on your picture using straight lines only.
Magic Wand Tool~ Allows you to select pixels of the same color. You can change the "tolerance" (how "off" the color can be) by changing the number in the OPTION BAR above the tool box. Here you can also select "add to selection, or subtract from the selection" by clicking on the correct option box. Another thing you can do it "REFINE EDGES". This will allow you to Sooth, feather, Contract or Expand the edges of your current selection.
Selection Tool~ Allows you to "paint" the pixels you want to select. In the OPTION BAR above the tool box, you can select "add to selection", "subtract from selection", change the shape and size of your brush.
Quick Selection Tool~ Allows you to select pixels in a larger area, instead of one by one. In the OPTION BAR above the tool box, you can select "add to selection", "subtract from selection, the size and shape of the brush. You can also select Refine Edges which allows you to smooth, feather contract or Expand your selected area.
Horizontal Text tool~ Allows you to add text to your page from left to right. See the OPTION BAR above the tool box for options on fonts, color, sizes, alignments, etc.
Vertical Text Tool~ Allows you to add text to your page from top to bottom.
Horizontal Type MASK Tool~ Allows you to make your text using the background you are typing it on. After you type your text, select the check mark to "OK" your action. Then use the short cut CTRL X (cut) on a PC or Command X(cut) on a MAC. Make sure the correct layer is highlighted that you want to :cut: you text out of. Then on a new layer, use the short cut Ctrl V(paste) on a PC or Command V (paste on a MAC to paste your text back on the page.
Vertical Type MASK Tool~ Allows the same as above, but writing your text from top to bottom. Follow the same steps.
Crop Tool~ Allows you to crop all layer at the same size to the appropriate size. You can do this by creating your own rectangle size, or by using the preset sizes(such as 4x6, 5x7, etc.) that are located in the OPTION BAR above the tool box.
Recomposition Tool~ Allows you to re size your picture by deleting parts, and saving others. When you click on the recomposition tool, instructions will appear on how to use it correctly.
Cookie Cutter Tool~ Similar to the Crop tool, but allows you to crop in a shape. You can pick the shape and size it accordingly, hit the check mark button to "OK" your selection, and it will crop out the rest of your picture.
Straighten Tool~ Allows you to draw a line on the horizon of your picture(or what ever "SHOULD" be going straight, and it will automatically rotate your picture to be straight.
Red eye removal Tool~ Allows you to click on the center of the red eye and it automatically fixes the coloring....most times! :)
Healing tool~ Allows you to remove discolored skin. Hit ALT and click an area of "clean skin" and then paint over your "not so clean skin". You can change the size and shape of the brush in the OPTIONS BAR above the tool box.
Spot Healing tool~ Similar to the healing tool, but it blurs the imperfection( age spots or pimples) in to the surrounding areas of the skin.
Clone Tool~ One of the BEST tools there is! ;) LEARN it...USE it! This tool allows you to pick an area on the picture by hitting ALT and clicking. then moving your mouse to a similar area that has an imperfection. It will then "paint" over your old are with the new one. Example: A beautiful sunset beach picture...except the old man scratching his butt down by the water. Click a similar area and paint over butt scratcher....PERFECT! ;) Also great for removing those darn time stamps on your pictures.
Pattern stamp Tool~ Similar to the paint brush, but allows you to paint with a selection of patterns that are found up in the Options Bar above the tool box.
Eraser Tool~ Allows you to erase any layer and leaving the other layers untouched. You can change the size and shape of the brush as well as the OPACITY(how MUCH gets erased) in the option bar above the tool box.
Background eraser tool~ Allows you to erase any layer, but turns the colored pixels into transparent pixels.
Magic eraser Tool~ Allows you to select any color from your picture, and it will automatically delete that same color everywhere else on your picture. You can change the tolerance as well as the opacity on the Option bar above the tool box.
Brush tool~ Allows you to paint! You choose the brush size, shape ,color and opacity in the Options bar above the tool box.
Pencil Tool~ Similar to the paint brush tool, but allows for more detailed lines.
Impressionist brush Tool~ Similar to the paint brush, but gives a "blurred impressionist painting" look.
Smart Brush and Detailed smart brush~ Both Very similar, Gives you get little add ons for Pictures of people. Such as teeth whitening, lightening skin, adding lipstick, etc.
Paint bucket Tool~ Allows you to paint in a whole background, or whole selected area with out having to paint each pixel. Use the color options at the bottom of the tool box for your fill color, or choose a pattern in the Option bar above the tool box.
Gradient Tool~ Allows you to turn a plain solid background into a blended or fading background. Pick you gradient option in the option bar above the tool box, then draw a line from your starting point to ending point on your picture. Each place you start and stop will change the look of your background.
Shape Tool~ Allows you to create a variety of shapes to add to your page. Use the color picker at the bottom of the tool box to select your color of your shape.
Smudge Tool~ Allows you to click and drag you image and smudge it, much like running your finger threw finger paint.
Blur Tool~ Allows you to blur small selections of your images.
Sharpen Tool~ Allows you to sharpen small sections on your image if it looks too blurred.
Sponge Tool~ Used to Saturate or Desaturate small areas of your image. You can change the size and shape of your brush in the options bar above the tool box.
Dodge Tool~ Used to lighten an image and bring out detail in shadowed or under exposed areas.
Burn tool~ Used to darken images and bring out highlights and details in over exposed areas.
Color Picker~ Allows you to change the colors, and pick custom colors by double clicking on the box. You can also switch background to foreground colors by hitting the small arrow next to the box.
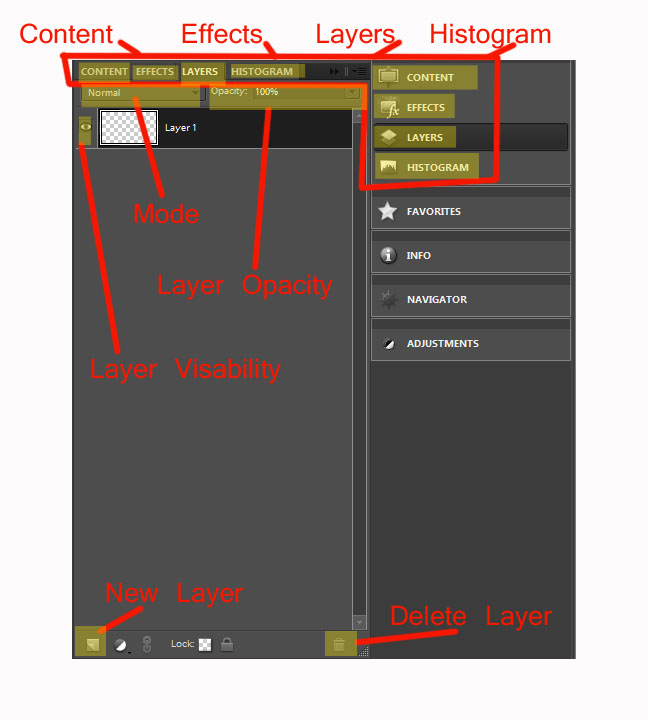
PHEW....... OK, now moving on to the LAYER BOX! This is your box that will show you you Actions, Filters, Histograms, Content extras, adjustments..but MOST important...your LAYERS! Working with layers is sooo important. It allows you to go back and make changes on any layer at anytime with out disrupting other layers, you can add and delete layers as well as change the opacity of single layers...it's beautiful! :) Here is what your layer box looks like when you have the LAYERS section picked. It also shows how you can get to the other sections to show your other options, Where to click to create a NEW LAYER, and where to click to DELETE a layer.
That was nice and easy huh! :)
Moving on to your TOP Control bar. This has sooo many options an buttons I would never be able to write everyone down...so here is each option broken down with a few of my MOST used things on it.
IMAGE OPTION:

Transform Image: Great tool for warping your images perspective.
Resize Image/Canvas: This allows you to resize your image OR canvas size. I use it mostly to enlarge my canvas when I like to add borders around my pictures.
Change Mode: Mostly used to change your picture from RBG color to Greyscale.
ENHANCE OPTION:

Adjust Lighting: This allows you to adjust your levels and curves as well as your brightness and contrast.
Adjust color: Allows you to control the hue and saturation. Changing the Hue of your selection is a great option for changing the color from say red to orange. And changing the saturation is a great way to give your pictures either a bright pop in color, or dulling it down to a simple black and white.
Unsharpen Mask: Allows you to sharpen or unsharpen your image depending on the levels you put in.
LAYERS OPTION:

New layer: creates a new blank layer.
Duplicate Layer: Creates a copy of the layer selected.
Delete layer: Deletes the selected layer.
Layer styles: Allows you to add drop shadows, borders(stroke), bevels edges and or a glow around your layer selected.
Create a Clipping mask: Great tool for making templates and collages....But lots of steps. SO I will cover this one in its own Tutorial! :)
Merge down: This adds to current selected layer with the one directly below it. Once tow layers are merged, it makes it harder to make changes to each object.
Merge Visible: This Adds ALL the layers that have the little eye ball next to it together. This is a much easier way instead of doing the merge down one my one if you have lots of layers. Or if you want all layer except one or two, just click the eye ball of that layer to turn off visibility, then merge, then turn it back on. If you want to save something with a transparent background, you want to Merge Visible instead of flatten Image before saving it.
Flatten Image: This will Add ALL Your layers together into one. This will happen automatically when you save it as a jpg. also.
SELECT OPTION:

Select all: Short cut.....CTRL A. This will select the WHOLE layer....not just the object in the layer.
Deselect: Short cut.... CTRL D. This will deselect any selection made.
Select inverse: Short cut....SHIFT CTRL I. This will select the opposite area than your originally selected.
Feather: You can change the value to determine how "feathered" you want your selection to be. The higher value, the more feathered.
Refine Edge: Combines Feathering with edge smoothing and allowing you to expand and contract your edges.
FILERS OPTION:
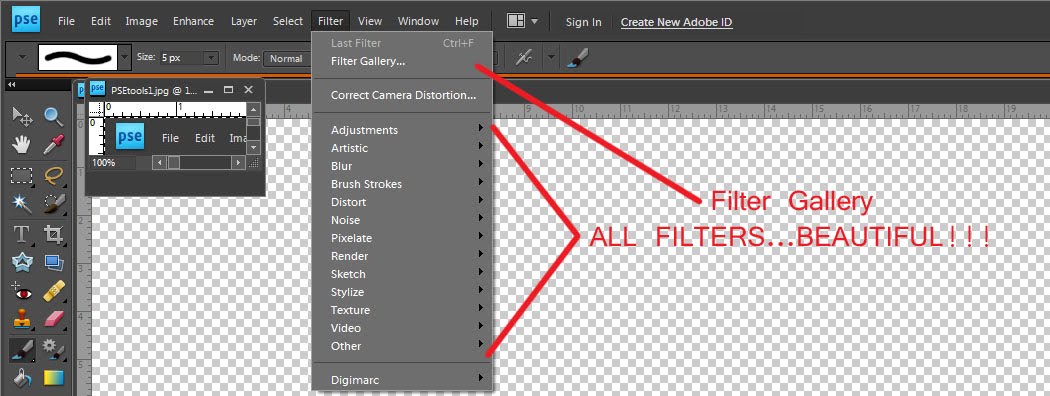
Filter Gallery: shows you examples of each filter. Filters are a great easy way to give your pictures a whole new look.
VIEW OPTION:

Actual Pixels: zooms your image into its actual pixel size..its print size.
Grid: Adds a grid to you page which aids in lining objects up or cropping images to the right size.
Snap to Grid: When moving an object around it will automatically snap to your grid or guide lines, insuring the perfect spot is located.
New Guide: allows you to create your own guides by typing in the right spot. Another easier way to do this is clicking any part of the ruler on either the side or top, and dragging it down onto your page. It places a blue line, which is a guide line. When you are done with your guide lines, there is a clear guides option on this drop down menu.
WINDOWS OPTION:

Tools: Adds your tool bar in if it ever goes missing.
Color swatches: Gives you a color swatch box to be able to pick colors from.
Content: Gives you lots of EXTRA add ons, such as frames, flowers, doodles, etc.
Effects: Allows you to change your picture with preset effects. Any ACTIONS your add will also fall under here.
Layers: Brings up your layer box if ever goes missing.
Project Bin: Shows ALL your open pages at the bottom of your screen. Great for creating work using multiple pictures. You can click and drag from your project bin into your main page and it automatically adds it on its own layer.
WOW...that's a lot of stinkin tools! And just think...that's only the beginning. But its enough to get you on your way, and learning the rest on your own! :) Feel free to share with me any awesome new tools you learned that are MUST HAVE tools!


No comments:
Post a Comment